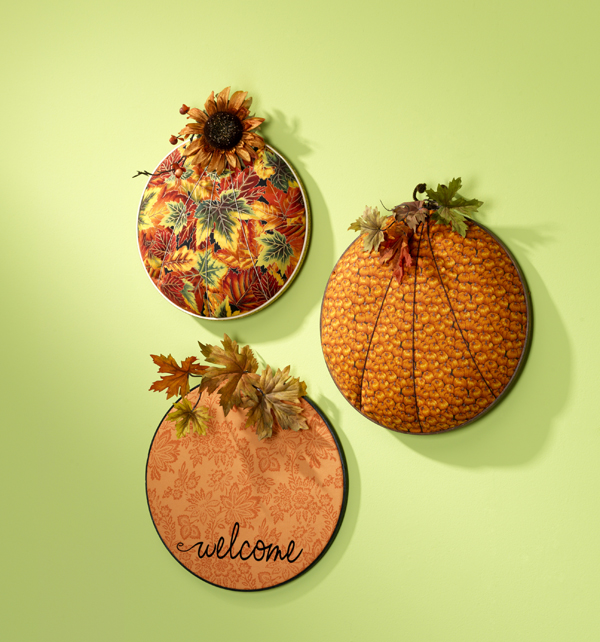
Use your favorite fall fabric collection and these simple hoops to make a festive and fun wall decor! Change your look every season quickly and easily! Use Soft and Bright batting to give your fabric some body and the hoop art some depth!
Supplies:
14″ or 18″ wooden embroidery hoop
Fat quarter of fabric
½ yard of fusible fleece
A bag of polyester fleece
ron on word* if you are creating the welcome pumpkin
Aleene’s Tacky Glue
Americana Gloss Enamel in complimentary color
Twine
Masking tape or painters tape
Cardboard larger than your hoop (a cereal box is great!)
Pen or pencil
Embellishments
Frixion pen, optional
Directions:
1. Using the Frixion pen, trace the inner hoop onto the fusible fleece. Center the same hoop on your fat quarter and again with the Frixion pen, trace around it. Again with the inner hoop, trace it onto the cardboard. Cut out each. The marks made by the Frixion pen disappear when you iron on the fleece.
2. Using the tape, securely tape the cardboard to the inner hoop. Set aside.
3. Center the fleece circle on the fat quarter, matching it to the traced mark. Following the fleece manufacturer’s directions, fuse the circle in place. Don’t trim the excess fabric.
4. Mound the polyester filling in the center of the cardboard and hoop. Center the fat quarter/fused fleece circle on top of this mound. The fused fleece circle keeps the polyester filling from looking lumpy on the outside. (If the entire fat quarter was fused with the fleece, you would find it very difficult to close the hoop.)
5. Slowly put the outside hoop on, smoothing the edges of fabric and stuffing the little bits of stuffing back inside the inner hoop and pulling the fabric to tighten it. Every so often you should flip the pumpkin over to make sure you don’t need to add or subtract stuffing in different areas. Tighten the screw at the top of the hoop to secure it and turn the pumpkin package over.
6. Begin taping the fabric to the cardboard, gently pulling the fabric as you tape. The entire process feels like you are trying to stuff things in a suitcase and close it! I don’t think you can over-tape the fabric to the cardboard. When you are happy with the way it looks on the front and the fabric is securely taped on the back, remove the outer hoop.
7. Measure 3 lengths of twine or ribbon long enough to go around your pumpkin and allow you to tie a knot to create your pumpkin segments. Being mindful of any directional design on your fabric, tie each piece of twine in the back to create the pumpkin segments as shown. Paint the outer hoop or glue ribbon on to it. When the paint is dry, run a bead of glue along the outside of the smaller hoop (on top of the fabric). Put the outer hoop back on the pumpkin and tighten the screw.
8. Add leaves, flowers, etc. to hide the hoop screw.
Note: If you want to create the welcome pumpkin, you will need a word, a fat quarter, ½ yard of fusible fleece and a hoop. Make sure the word will fit into the size hoop you choose. Fuse the fleece to your fat quarter. Trace the outer hoop onto the right side of your fabric. Add 2 all the way around this circle and cut it out. Following the manufacturer’s directions, fuse the word onto the right side of your fabric circle. If you plan to paint the outer hoop, now is the time to do that. Centering the circle in the inner hoop, place the outer hoop on and tighten, pulling the fabric taut as you go. Tighten the screw as tight as you are able. Flip the pumpkin over and trim the excess fabric off the back. Trim the hoop with ribbon, etc. Cover up the hoop screw as desired with flowers, leaves, ribbons, etc.
View Events by Location
Meridian, ID | Beaverton, OR | Gresham, OR | Salem, OR | Hazel Dell, WA | Kennewick, WA | Vancouver, WA
Upcoming Events
December 31
All Store Locations One day only, last Tuesday of every month! Join us the last Tuesday of every month for Customer Appreciation Day where everything is 25% off or MORE! This day was made for YOU to show our amazing customers how much we appreciate [...]
December 14 @ 2:00 pm - 4:00 pm
All store locations! Join us to make yourself or a friend a pair of Holiday earrings that you can enjoy all of December. We’re getting ready for the holiday season! You will get to see how easy these earrings are to make when using our [...]

