We’ve been carrying the Eco-Chic Tote Bag Kits in our stores for quite some time. They’re quick to make, sturdy, reusable, and reversible! The best thing about them is that they have a flat bottom, which makes them far more useful than other tote bags. They’re a good project for a new sewer, but creating the square bottom can be very confusing. The explanation and photos below should help.
Here are a few helpful tips for making these bags. (Some apply to any sewing project.)
- Evenly match your raw edges and pin.
- Pay attention to your seam allowance and keep it even as possible. Especially when you are making a lining. You won’t have puckers at the top of this bag when topstitching if the lining and outer bag are the same size.
- When you are combining the lining and outer bags and find one side or the other is a bit bigger, place the bigger side against the feed dogs. It feeds that side a bit faster than the top fabric unless you are using a walking foot.
- When directions tell you to press or iron, do it! It can make a homemade job look professional. So simple.
- The webbing will melt! Try to avoid touching it with the iron.
- Lengthen your stitch to a 3.0 or a 3.5 when topstitching. Don’t have matching thread? Use a contrasting or variegated thread.
ECO-CHIC SHOPPING TOTES DIRECTIONS:
Our kits are created using 2 – 5/8 yard cuts of fabric. One fabric will be the inner or lining fabric and the other will be the outer fabric. You can make them any size you want, but this is a good size for grocery shopping. You choose the color of webbing for the handles in our 1-yard pre-packed cuts.
1 Read through the instructions before beginning. Use a ½” seam allowance during construction. Cut the 2 fabrics 21” x 21”.
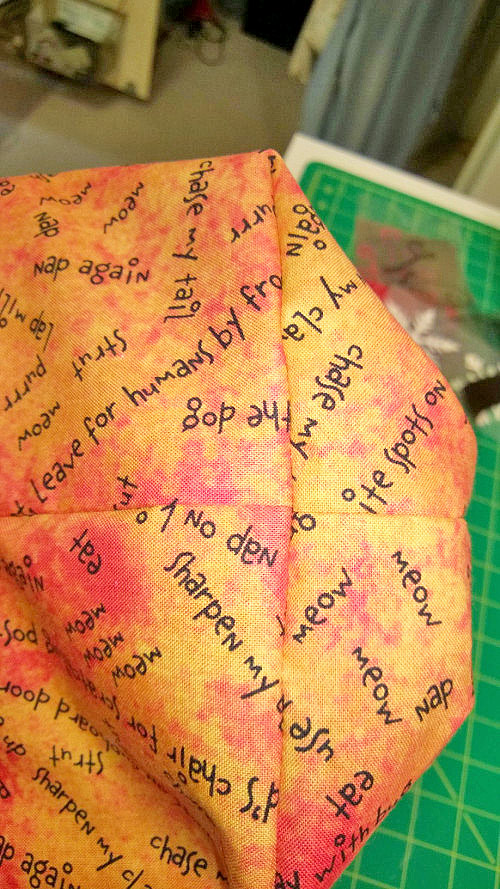
2. Sew the outer bag fabric with right sides together, down the sides and across the bottom. The next step is where it can be tricky. You need to cut a 3” square out of each bottom corner. Why a 3” square? To create a 6” square bottom.

3. Match the side seam to the bottom seam. Pin the seam allowances going in opposite directions. You can feel them “nest” against each other which will create a nice square bottom.

4. Repeat for the other side.
5. Stitch across each pinned area. Turn the bag right side out. Check out the bottom corners of your bag
6. Repeat step 2 and 3 with the lining fabric, leaving about a 4” opening across the bottom seam for turning. This does mean you will have 2 short seams between the boxed bottom and the opening in the lining.
7. Cut the 1 yard of webbing in half, creating 2-18” pieces. Pin each end of the webbing handle to one side of the top of the outer bag, about 5” from each side seam.

8. Make sure the webbing isn’t twisted. Repeat with the other side of the outer bag. (If it sounds confusing, think about the handles on a paper shopping bag.) I stitch them in place using a ¼” seam, going back and forth several times.
9. Place the outer bag inside the lining bag with right sides together and stitch around the top.
10. Turn the bag right side out through the opening in the lining. Stitch the opening shut. Yes, you can do it by machine. It’s on the inside.
11. Press and topstitch around the top of the bag.
Now that you’ve made one, these make great gifts in one hour or less. You can customize the bag for a recipient by your fabric choice. Stop by our store and find the perfect fabric for your tote!
Tips for Stars and Stripes Tote featured at top:
The Stars and Stripes bag has a pocket on the outside and button embellishments on the pocket. I had a scrap of fabric leftover that was 6” x 11”. I folded the fabric in half with right sides together and pinned. I left an opening in the middle of a seam to turn the pocket right side out. Before turning it right side out, I trimmed the corners to reduce the bulk. After turning the pocket, I gently poked the corners out, and pressed it making sure the seam opening was folded in. It will be stitched down when you sew the pocket in place. I folded one piece of the bag front in half and placed a pin in the center. Using the same method, I found the center of the pocket. Matching the pins, I placed the pocket 3”-4” from the bag top.
Stitch the pocket in place, about ¼” from the pocket edge. (again, I didn’t have the matching thread but used a blue that matched the blue in the print) I like longer handles so I used two packages of twill tape for the handles on this bag. Each strap is 1 yard. Press a ¼” fold on the other side of the strap fabric. Fold the strap in half, matching the folded edges and press. Stitch along the long edge of the strap 3-4 times, reversing the direction each time you stitch a new line. Repeat for the other strap
Tips on making the Watermelon Bag:
The watermelon bag appears to have a strip of fabric decorative edging but it’s really the lining fabric, rolled out and over the outer fabric. To get this look, I cut the outer bag fabric 3” shorter than the lining fabric, i.e. 18” x 21”, while the lining fabric is 21” x 21”. When you turn the almost completed bag right side out, the lining fabric rolls all by itself!
I made the handles out of scrap rind fabric. I cut two pieces of handle fabric 2 ½” x 24” and two pieces of batting 1” x 24”. With wrong sides together, press the handle fabric in half. Place a batting strip in one of these halves. Fold one raw edge over the batting and press in place.

We also carry Eco-Chic Tote Kits with 2 coordinating fabrics and instructions at all Craft Warehouse stores. we update with new fabrics all the time. Come in to see all the options.


We carry Eco Tote Kits year round in seasonal prints at Craft Warehouse. You can also request a free project sheet when there.
Save and Share
MAKE-N-TAKES ARE BACK
2-4PM Every Saturday
Saturdays from 2-4PM Craft Warehouse hosts a special, in-store Make-N-Take event at ALL locations. Come Check it out!
View Events by Location
Meridian, ID | Beaverton, OR | Gresham, OR | Salem, OR | Hazel Dell, WA | Kennewick, WA | Vancouver, WA
Upcoming Events

April 17 - April 29
Attention, Lawn Fawn fans! Take a creative journey and visit one of our inspiring locations for an exclusive promo event happening from April 17th to April 29th! Purchase any Lawn Fawn products totaling $60 or more In-Store, and receive a FREE gift!* This special gift, [...]
May 25 @ 2:00 pm - 4:00 pm
Join us at all store locations! Fun and easy watercolor technique to quickly color die cut of stacked books. During this event we will show you a simple way to create your own faux watercolors with ink pads. Add some cute paper and turn it [...]
More from Our Create Blog

This pretty scarf was made with the Canyon Colors by [...]

Check out this delightful and hassle-free baby blanket pattern from [...]

Faux plants in a shadow box frame can bring a [...]


All you need are some scraps of paper to make [...]

This cheery, charming, and pretty Valentine's Envelope Garland is just [...]

Have you heard of knitting or crocheting a Temperature Blanket? [...]

Temperature Blankets have been a fun trend. When making a [...]


A fun, easy project to do with family & friends [...]

Are you Ready for the next concert, concert movie, or [...]